My personal ‘daily-driver’ laptop is a ThinkPad X1 Extreme Gen 2. I’ve had this since September 2019, and after a number of years the battery is holding less charge. It was time to do something about it.
Investigations
I’d been searching for some time for a replacement battery, but alas, Lenovo no longer sell the battery. My inner cynic suspects that this is a forcing factor to move people onto newer hardware. I’d seen lots of ‘compatible’ batteries from questionable online stores, and remained unconvinced of their use.
Not sure how I came across the iFixit kit, but I chose the basic kit in addition to the battery, even though I really didn’t need it. But, I’m glad I did, for reasons described below. In preparing for the battery swap, I watched a number of X1 Extreme/P1 videos (the later models use a different design – so not relevant). I read some documentation including the excellent X1 Extreme Field Manual. I thought I knew what to do – I was wrong, or at least missing some information.
The Swap
The challenges were in two specific areas:
- Removing the battery to motherboard connector &
- Refitting the battery to motherboard connector.
It was a little tricky disconnecting the connector; its like nothing I’ve seen before. The videos seemed to have people picking/flicking the connector up with their fingernail or a small plastic pry tool. After a number of attempts and references to documentation, I succeeded.
The ThinkPad’s documentation requires you to remove the padding strips around the outside of the battery and refit them to the new battery. However, when I tried this, the pads disintegrated and the sticky pads they were glued to were stuck tight to the old battery. So…I skipped that part – making a mental note to look for them in the near future.
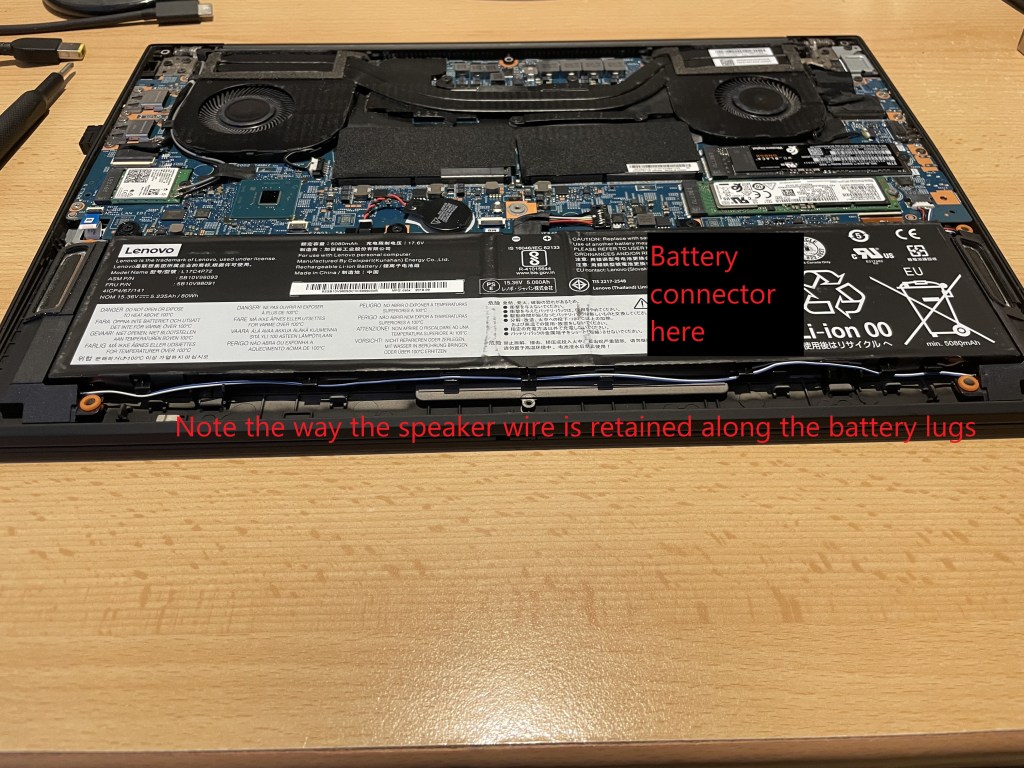
One thing I noted from the videos of the battery swap was the semi-aggressive removal and refitment of the speaker wires which travels along the front edge of the laptop. Thankfully, I took photos of that fitting…
The Hard Part of the Swap
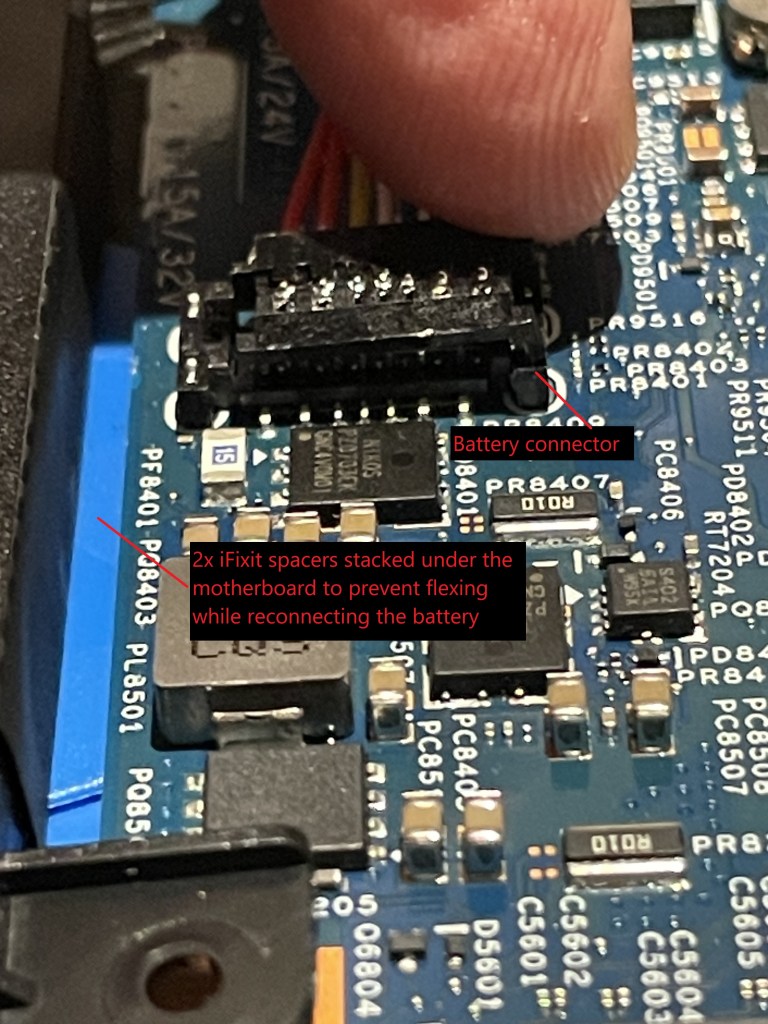
The hard part came in connecting point #2 above – connecting the battery to the motherboard. The connector is a surface connector with two downward facing hooked retention tangs. This probably has a name, but I’ve no idea what.
After following the instructions and screwing the new battery in place, no matter how I tried I couldn’t get the connector to latch on the motherboard. I became concerned at how much the motherboard was flexing. I looked at the iFixit kit and thanked my past self for buying it.
What I did was to unscrew the battery, then while holding the battery in one hand, with the other push two stacked delta shaped spacers in the iFixit kit to ‘pack’ between the motherboard and the keyboard side (the laptop is upturned) – in the vicinity of the battery connector.
I could then rest the battery in it’s spot; then push the connector while preventing the motherboard from flexing. After this didn’t work, I changed my approach to connecting. Instead of trying to push the connector in equally (both tangs together); I locked one tang into place, before pushing the other in. I then held the battery in one hand, removed the delta spacers, reseated the battery and screwed into place.
Upon refitting the laptop’s bottom cover and restarting, all was well. I followed the recalibration instructions and the battery is fine. I have noticed the laptop i more sprightly, and whereas I was struggling to get a quotes life of about 90 mins, I’m now over 3.5 hours with half brightness on a 4K touch screen.
Hopefully this will keep it going until Windows 12 comes along…! If not, I now have a good understanding of how to repeat this swap.
Links
iFixit ThinkPad X1/P1 Battery Replacement Kit – here
ThinkPad X1 Extreme Gen 2 Hardware Maintenance Manual – here
